Configuration of EBS ActiveGuard and EBS ActiveTrack communicators #
The first step in configuring the recorder is setting the appropriate communication parameters for the device, enabling it to send signals to the Safestar system. After properly connecting the device and launching the program, read the data from the device. Next, enter the IP address and port on which the device will transmit.
IMPORTANT INFORMATION! If you are using your own EBS OSM server and hub, before configuring the device, contact your system administrator and obtain the correct parameters for communication with the Safestar system server.
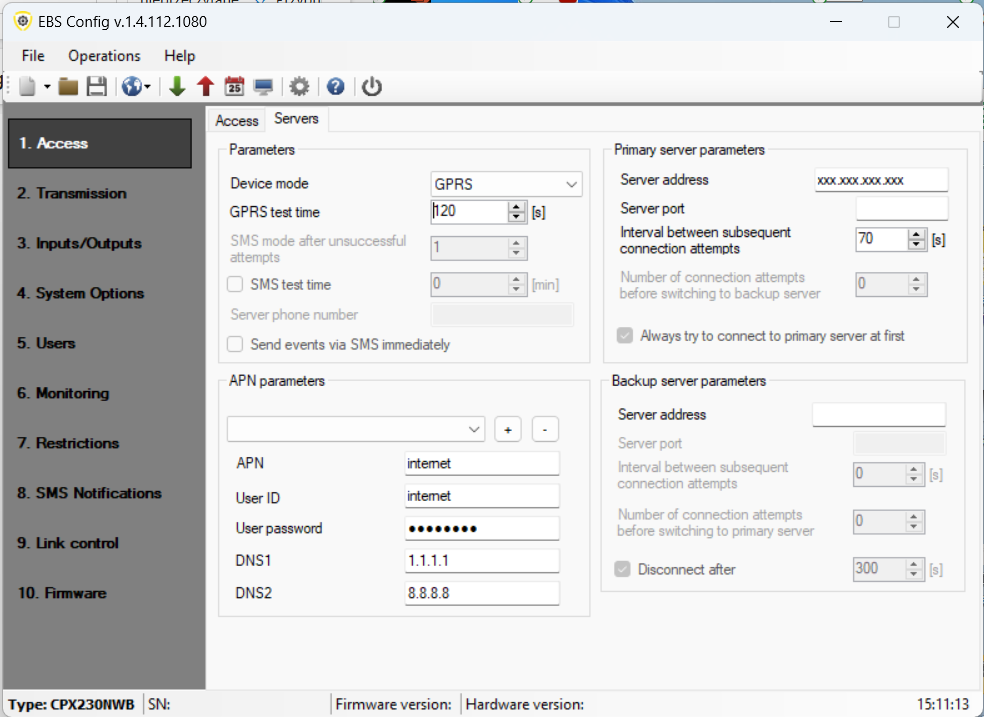
In the EBS Config program, go to the Access -> Servers tab and fill in the fields:
- Device mode: select “GPRS”
- GPRS test time (This is the interval between sending tests from the device to the server): suggested value above 300s.
- Primary server parameters:
- Server address: (IP address of the server to which the device will send signals)
- Server port: (TCP port of the server to which the device will send signals) (the port varies depending on the device type)
- APN parameters:
- ANP; ID; Password (dependent on mobile operator)
- DNS1 and DNS2 (required when providing domains instead of IP addresses) (example DNS servers: 1.1.1.1; 8.8.8.8
Configuration in the Safestar system #
Adding a device to the system #
IMPORTANT INFORMATION! Adding a device to the system is described in detail in a separate manual.
The device addition form is available via:
- Account tab → Devices tab, and then Add device in the left menu,
- Account tab → Accounts tab, selecting the account to which the device should be added and clicking Add Device
Complete the form accordingly:
- Account – the account to which the device will belong,
- Profile – first select Device type → EBS AG (or ABS AT), then select the appropriate Device profile (by default, the EBS ActiveGuard profile is selected); after selecting the profile, the signals defined in the profile should be loaded (if they were previously defined),
- Concentrator – concentrator from which data from recorders will be downloaded (parameter to be agreed with the system administrator); for testing you can select: EBS OSM (XML) — DMSI Tests,
- Identifier – the identifier of the AG (AT) recording device (the identifier is located on the recorder’s battery cover) preceded by the characters ag, omitting the leading zeros; e.g. for a recorder with the identifier 093659, enter: ag93659 (or, similarly, at93659),
- Device name – optional field; the name entered will be visible in the system; it is mainly used for reports,
- SIM card – optional field; it is possible to select a SIM card from the card database available in the Account → SIM cards module,
- Signal configuration for an EBS AG device – it is possible to edit and add new signals described in the system directly at a given device; the list of signals consists of:
- signal code,
- signal name (with the possibility of overwriting) – the entered name will be displayed in the CONSOLE module,
- alert type (with the possibility of overwriting) – the entered alert type will be displayed in the CONSOLE module.
Once you’ve finished entering the data, click the Add button. If the data has been entered correctly, the added device should be available in the device list. To verify that the device is transmitting data to the Safestar system correctly, preview the device data (the preview icon in the device list). Next, generate several signals from the recorder (e.g., Panic). After refreshing the device preview several times, the generated signals should appear in the list.
Adding an object and associating a device with the object #
The object addition form is available via:
- Account tab → Objects tab, and then Add object in the left menu,
- Account tab → Accounts tab, select the account to which the object is to be added and click Add object.
Complete the form (Basic Data tab) as follows:
- Account – the account to which the object will belong,
- Object name – device name visible in the system,
- Object address – optional field,
- Object description – optional field,
- Object groups – optional field; it is possible to assign the object to selected groups,
- Procedures – optional field; it is possible to assign procedures to the object,
- Devices – optional field; here you should search for a previously entered device (recorder); this is done by entering the device ID (the system will suggest the appropriate device); it is possible to add several recorders to the object.
IMPORTANT INFORMATION! When adding objects, you can immediately configure rounds in the Rounds tab. Configuring rounds is described in the next section of this manual.
Once you’ve finished entering your data, click the Add button. If you entered the data correctly, the added object should be available in the object list.
Rounds configuration #
IMPORTANT INFORMATION! Configuration of points, rounds, and routes is described in a separate manual.


